|
|
|
|
|
|
|
|
|
|
||||||||||
|
TZWS Class: Level 1E - Lesson 1 - Part 2
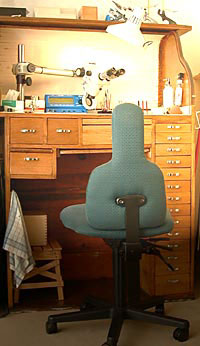
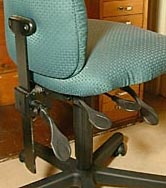
The ease of learning watchmaking --and the enjoyment derived from it--can be greatly affected by the working environment. It is mostly the familiar story: proper seating, an appropriate work surface, and good lighting. Ideal seating is provided by an adjustable-height chair that allows a range from normal height (relative to the work surface), lowering to bring you to eye-level with the surface. Most work is done with a loupe at less than six inches from the watch, and constant bending of the back and neck soon becomes tiring or injurious.
The work
table should be level (so that parts do not roll), and a clean piece of
lintless white paper should be tacked or
Do not rush or skimp in setting up a comfortable, usable work environment. Attention here will pay off well in comfort, pleasure, and productivity. EXPLORING YOUR TOOLKIT
TWEEZERS
The #2 tweezers supplied is a good (industrial) quality, antimagnetic Dumont and is the primary tool of the watchmaker. The shape, length, and flexibility ("weight") of the tips makes the #2 ideal for almost all assembly and disassembly tasks. In using a tweezers, one must learn to apply enough pressure to hold the part, but not so much that the part "shoots" from the tweezers. One becomes accustomed to the necessary pressures for a particular set of tweezers and it is a poor idea to switch constantly between different tweezers. Always use the #2 for a task unless you have a good reason to use something else.
The tips of
all tweezers are delicate and should be protected from damage. A tweezers
with gouged, bent, or misaligned tips is useless and will cost you dearly in
lost and damaged parts. Repair or replace them. With more
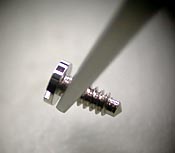
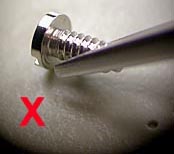
Also included in the kit is a high quality Dumont Dumoxel antimagnetic #5 tweezers. This very fine-tipped tweezers is used only for manipulating very fine parts such as the balance spring and shock assembly retention spring. Although the #5 is not often used, when it is needed it is indispensable. If used for general assembly work, the #5 proves to be too light and will result in many lost parts--shot into the Triangle. In learning to pick up parts with tweezers, there is one cardinal rule in addition to the rule about correct pressure: pick up the part oriented in the tweezers in a way that facilitates what you will ultimately be doing with the part. This means visualizing movement, angles, and purpose before even touching the part.
You cannot insert a screw in a hole if you are holding the threaded end of the screw. Attempting to manipulate the part into correct position once you arrive at the work only encourages damage and lost parts. If you do arrive at the work with a part misoriented in the tweezers, place it back on the bench (not the movement) and pick it up again. With practice, this approach becomes intuitive. You should also be confident of your grip on a part before approaching your work. It is better to drop a part on the bench than in a movement where it can cause considerable damage if it contacts delicate items like the balance spring. SCREWDRIVERS
The tip of a screwdriver must be maintained perfectly square and flat. A worn or damaged tip should be replaced or repaired because any irregularity of the tip will mar or damage screws. For repair, a fine Arkansas oil stone works well, being careful to keep everything square and flat, including the slot edge of the tip. In very fine work, the already excellent finish of the Bergeon first-quality drivers is often improved upon by polishing tips on a buffer with steel rouge--being careful not to round edges.
|
||||||||||||||||||
|
||||||||||||||||||
|
|
||||||||||||||||||
|
Copyright © 2001-2004 A Bid Of Time, Inc., All Rights Reserved | ||||||||||||||||||
 THE
WORKING ENVIRONMENT
THE
WORKING ENVIRONMENT
 taped
in position. An artist's 100 pound, smooth Bristol (available in pads at art
supply shops) is ideal. The paper provides a renewable clean surface and
contrasts with the parts sitting on it. Bergeon also sells a popular work
mat (No. 2746) with an optically and physically softer surface and
"anti-bounce" properties that make lost parts a bit less frequent. The mat's
resilience also protects parts dropped on it from damage and makes very flat
parts easier to pick up with the tweezers. For a permanent work table, back
and side "splashes" also help keep errant parts on the table. Ideally, the
floor surface surrounding the work surface is hard and a medium-dark color
that contrasts with the majority of parts that fall on it.
taped
in position. An artist's 100 pound, smooth Bristol (available in pads at art
supply shops) is ideal. The paper provides a renewable clean surface and
contrasts with the parts sitting on it. Bergeon also sells a popular work
mat (No. 2746) with an optically and physically softer surface and
"anti-bounce" properties that make lost parts a bit less frequent. The mat's
resilience also protects parts dropped on it from damage and makes very flat
parts easier to pick up with the tweezers. For a permanent work table, back
and side "splashes" also help keep errant parts on the table. Ideally, the
floor surface surrounding the work surface is hard and a medium-dark color
that contrasts with the majority of parts that fall on it. 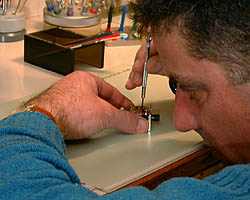 Without
good light there is no watchmaking. I prefer a combination of incandescent
and fluorescent light, the two combined in a single, adjustable
"architect's" lamp. The incandescent makes the light more comfortable, while
the fluorescent is sharper and helps distinguish fine details. Be sure to
move the light around and make it work for you. You will find that different
positions and angles will reveal different details of the work. A source of
diffuse natural light is also useful when combined with an adjustable
artificial source.
Without
good light there is no watchmaking. I prefer a combination of incandescent
and fluorescent light, the two combined in a single, adjustable
"architect's" lamp. The incandescent makes the light more comfortable, while
the fluorescent is sharper and helps distinguish fine details. Be sure to
move the light around and make it work for you. You will find that different
positions and angles will reveal different details of the work. A source of
diffuse natural light is also useful when combined with an adjustable
artificial source.  The
TimeZone Level 1 toolkit provides an excellent selection of basic tools and
materials. These include (1) #2 tweezers, (2) #5 tweezers, (3)
a movement holder, (4) carousel screwdriver set, (5) dust
blower, (6) movement cover, (7) covered parts trays, (8
) Rodico cleaning putty, (9) 10-power loupe, (10) 4-power
loupe, ( 11) peg wood sticks, (12) a piece of pith wood, (13)
the ETA caliber 2801-2 with the hour wheel packaged separately, and (14
) a box of lintless watch paper.
The
TimeZone Level 1 toolkit provides an excellent selection of basic tools and
materials. These include (1) #2 tweezers, (2) #5 tweezers, (3)
a movement holder, (4) carousel screwdriver set, (5) dust
blower, (6) movement cover, (7) covered parts trays, (8
) Rodico cleaning putty, (9) 10-power loupe, (10) 4-power
loupe, ( 11) peg wood sticks, (12) a piece of pith wood, (13)
the ETA caliber 2801-2 with the hour wheel packaged separately, and (14
) a box of lintless watch paper. 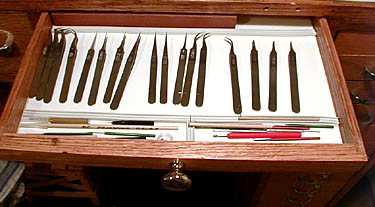 There
are dozens of different tweezers available, but the two tweezers supplied
cover better than 95% of the function needed by a watchmaker. As you become
more experienced and understand your needs, you can experiment with
different sizes, weights, and quality, but in the beginning too many
different tweezers is simply confusing.
There
are dozens of different tweezers available, but the two tweezers supplied
cover better than 95% of the function needed by a watchmaker. As you become
more experienced and understand your needs, you can experiment with
different sizes, weights, and quality, but in the beginning too many
different tweezers is simply confusing.  experience,
a pair of the superb (and expensive) Dumont Dumostar (antimagnetic, super
hard) #2 tweezers makes a wonderful Christmas gift for the watchmaker.
experience,
a pair of the superb (and expensive) Dumont Dumostar (antimagnetic, super
hard) #2 tweezers makes a wonderful Christmas gift for the watchmaker.
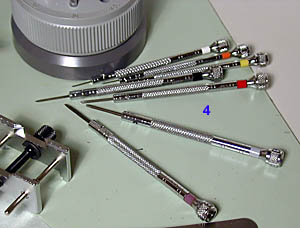 A
complete set of Bergeon first-quality screwdrivers (No. 5970) is supplied in
the TZWS toolkit. The weighted carousel in which they are mounted makes them
easily accessible, and the center cover of the carousel contains nine spare
blades. Sizes range from 0.5 ("50," orange) to 2.5 ("250," blue)
millimeters.
A
complete set of Bergeon first-quality screwdrivers (No. 5970) is supplied in
the TZWS toolkit. The weighted carousel in which they are mounted makes them
easily accessible, and the center cover of the carousel contains nine spare
blades. Sizes range from 0.5 ("50," orange) to 2.5 ("250," blue)
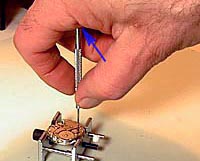
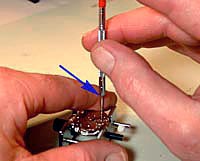
millimeters. 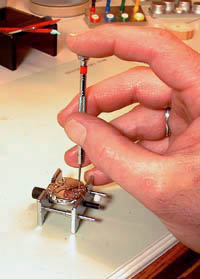 There
are only two correct ways to hold a screwdriver for watchmaking, and these
should be practiced at all times. The first, shown left, is with the
index finger on the rotating end-ball of the driver. The second, below
left, is with the end-ball on the ball of the palm (blue arrow ).
This position provides more torque for larger screws. In both positions, the
end-ball remains stationary while the shaft of the driver is rotated between
the fingers. A variation for both positions is shown below right .
Here the edge of the index finger of the opposite hand is used to stabilize
the blade (blue arrow) and prevent it from slipping off the screw.
The highly polished screws of high-grade movements demand special care in
this regard.
There
are only two correct ways to hold a screwdriver for watchmaking, and these
should be practiced at all times. The first, shown left, is with the
index finger on the rotating end-ball of the driver. The second, below
left, is with the end-ball on the ball of the palm (blue arrow ).
This position provides more torque for larger screws. In both positions, the
end-ball remains stationary while the shaft of the driver is rotated between
the fingers. A variation for both positions is shown below right .
Here the edge of the index finger of the opposite hand is used to stabilize
the blade (blue arrow) and prevent it from slipping off the screw.
The highly polished screws of high-grade movements demand special care in
this regard.